
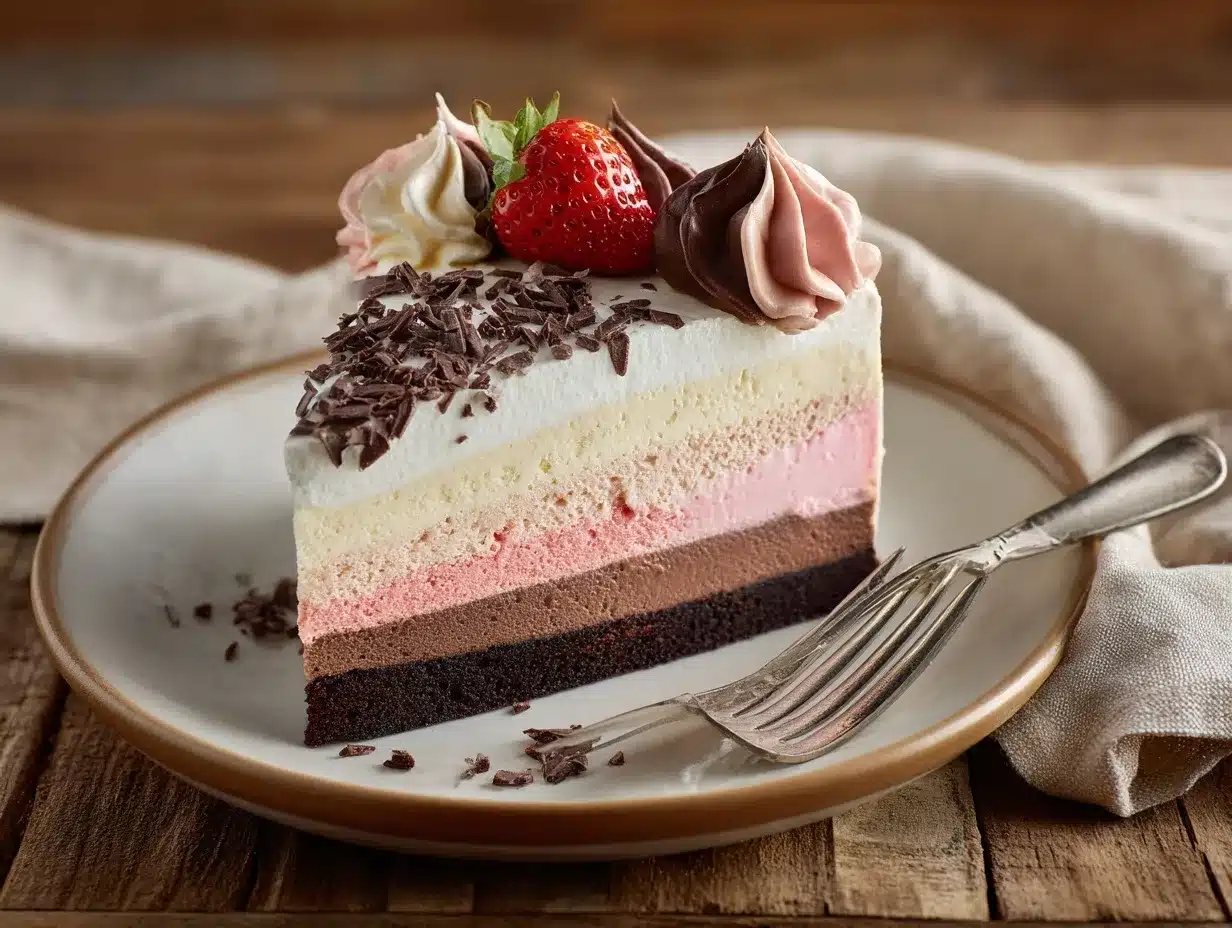
Picture this: layers of creamy chocolate, velvety vanilla, and sweet strawberry ice cream stacked together in a luscious frozen dessert. The Neapolitan Ice Cream Cake is the ultimate treat for summer gatherings, birthdays, or whenever you need a little indulgence. It’s a nostalgic nod to childhood but with a modern twist that’s perfect for impressing your friends and family. Best of all? It’s incredibly easy to whip up, no baking required!
I first stumbled upon this recipe while brainstorming ways to use leftover ice cream from a party, and let me tell you—it’s been a hit ever since. With only a few simple ingredients and minimal effort, you’ll have a dessert that looks stunning and tastes even better. Whether you’re a seasoned baker or just someone who loves ice cream, this recipe is one you’ll want to make over and over again.
Why You’ll Love This Recipe
Let’s be honest, who doesn’t love the classic Neapolitan flavor combo? This ice cream cake takes that beloved trio and turns it into a show-stopping dessert. Here’s why you’ll fall head over heels for this recipe:
- Quick & Easy: No oven required! Perfect for when you need a dessert in a hurry.
- Minimal Ingredients: Just ice cream, cookies, whipped cream, and a touch of creativity.
- Perfect for Any Occasion: From summer barbecues to holiday celebrations, this cake fits the bill.
- Crowd-Pleaser: Kids, adults, and everyone in between will be asking for seconds.
- Instagram-Worthy: The layered colors make this dessert a stunner on the table.
What sets this cake apart is its simplicity paired with its wow factor. The texture is dreamy, the flavors are refreshing, and it’s customizable to suit your preferences. Trust me, one bite and you’ll understand why this recipe is my go-to frozen dessert.
What Ingredients You Will Need
This Neapolitan Ice Cream Cake uses simple ingredients you can find at any grocery store. Here’s the lineup:
- Chocolate Ice Cream: Softened for easy layering (opt for a rich, creamy brand).
- Vanilla Ice Cream: The neutral layer that ties everything together.
- Strawberry Ice Cream: Adds a fruity, refreshing sweetness.
- Chocolate Cookies: Crushed to create a crunchy base (Oreo or your favorite chocolate cookie).
- Butter: Melted, to bind the cookie crust.
- Whipped Cream: For the topping (homemade or store-bought works).
- Sprinkles or Fresh Fruit: Optional, for garnish.
You can easily swap strawberry ice cream for another fruity flavor or use gluten-free cookies for a dietary-friendly option. Feel free to get creative with the toppings too—chocolate drizzle, crushed nuts, or even edible flowers would be beautiful additions!
Equipment Needed
You won’t need any fancy gadgets to make this recipe, but here’s what will come in handy:
- Springform Pan: Ideal for easy removal and presentation.
- Mixing Bowl: To combine the cookie crust.
- Spatula: For smoothing out the ice cream layers.
- Plastic Wrap: Helps cover the cake while freezing.
- Knife: To slice and serve clean portions.
If you don’t have a springform pan, a regular cake pan or loaf pan will work. Just line it with parchment paper for easier removal!
Preparation Method
- Prepare the crust: Crush the chocolate cookies into fine crumbs using a food processor or a zip-top bag and rolling pin. Mix the crumbs with melted butter until well combined, then press into the bottom of a springform pan. Freeze for 15 minutes to set.
- Layer the chocolate ice cream: Soften the chocolate ice cream until spreadable, then spoon it over the crust. Smooth it out with a spatula and freeze for 30 minutes.
- Layer the vanilla ice cream: Repeat the process with the vanilla ice cream, spreading evenly over the chocolate layer. Freeze for another 30 minutes.
- Layer the strawberry ice cream: Finish with the softened strawberry ice cream as the top layer. Smooth it out and freeze the entire cake for at least 4 hours or overnight.
- Add the whipped cream: Remove the cake from the pan and spread whipped cream over the top. You can pipe it for a decorative look or simply spread it evenly.
- Garnish and serve: Add sprinkles, fresh fruit, or any toppings you like. Slice and serve immediately for the best texture.
Pro tip: Run your knife under warm water before slicing for cleaner cuts!
Cooking Tips & Techniques
Making a layered ice cream cake is straightforward, but these tips will ensure it turns out perfect every time:
- Soften Ice Cream Properly: Let each flavor sit at room temperature for 10–15 minutes before spreading. Avoid melting it completely.
- Work Quickly: Ice cream layers can melt fast, so prep everything before you start assembling.
- Freeze Between Layers: Don’t skip the freezing steps—it ensures clean, distinct layers.
- Use a Springform Pan: It makes removal a breeze and keeps the layers intact.
- Customize the Flavors: Not a fan of strawberry? Try raspberry or caramel instead!
If your cake starts to melt while decorating, pop it back in the freezer for 10 minutes to firm up before continuing.
Variations & Adaptations
This Neapolitan Ice Cream Cake is versatile, so feel free to make it your own:
- Gluten-Free Option: Use gluten-free chocolate cookies for the crust.
- Dairy-Free Version: Substitute regular ice cream with your favorite dairy-free alternatives.
- Flavor Swap: Replace strawberry ice cream with mango, pistachio, or coffee for a unique twist.
- Holiday Flair: Add crushed candy canes to the whipped cream for a festive touch.
- Mini Cakes: Assemble the layers in individual ramekins for personal-sized servings.
One of my favorite variations is swapping the cookie crust for a brownie base. It’s decadent and adds a chewy texture!
Serving & Storage Suggestions
Here’s how to get the most out of your Neapolitan Ice Cream Cake:
- Serving Temperature: Serve straight from the freezer for clean slices and firm layers.
- Presentation: Garnish with fresh fruit, sprinkles, or chocolate shavings to make it pop.
- Storage: Cover tightly with plastic wrap or store in an airtight container. It’ll stay fresh in the freezer for up to a week.
- Reheating: No need to reheat—just let it sit at room temperature for 5 minutes before serving.
As the cake sits, the flavors meld beautifully, making it even more delicious the next day!
Nutritional Information & Benefits
While this is definitely a treat, here’s a quick look at the estimated nutritional values (per slice):
- Calories: Approximately 350
- Fat: 18g
- Sugar: 28g
- Protein: 5g
With its balanced trio of flavors, this cake is perfect for satisfying your sweet tooth without going overboard. Plus, the homemade touch means you can control ingredient quality to suit dietary needs.
Conclusion
The Neapolitan Ice Cream Cake is more than a dessert—it’s a memory maker. From the vibrant layers to the nostalgic flavors, it’s a recipe that’s guaranteed to bring smiles to any gathering. Whether you’re whipping it up for a special occasion or just because, this cake is pure joy in every bite.
I’d love to hear how you make this recipe your own! Share your thoughts, variations, or questions in the comments below. And don’t forget to save this recipe for later—you’ll want to make it again and again!
Happy freezing, and enjoy every creamy slice!
FAQs
Can I make this cake ahead of time?
Absolutely! It’s best made a day ahead so the layers can freeze completely.
What’s the best way to soften ice cream?
Let it sit at room temperature for 10–15 minutes or microwave it for 10-second intervals.
Can I use store-bought whipped cream?
Yes, both homemade and store-bought whipped cream work beautifully.
How do I prevent the crust from sticking?
Line your pan with parchment paper or grease it lightly for easy removal.
Can I use different ice cream flavors?
Of course! Mix and match flavors to create your own signature ice cream cake.
Pin This Recipe!

Neapolitan Ice Cream Cake

Layers of creamy chocolate, velvety vanilla, and sweet strawberry ice cream stacked together in a luscious frozen dessert. Perfect for summer gatherings, birthdays, or any occasion.
- Prep Time: 15 minutes
- Cook Time: 4 hours (freezing time)
- Total Time: 4 hours 15 minutes
- Yield: 8 servings
- Category: Dessert
- Cuisine: American
Ingredients
- Chocolate Ice Cream, softened
- Vanilla Ice Cream, softened
- Strawberry Ice Cream, softened
- Chocolate Cookies, crushed
- Butter, melted
- Whipped Cream
- Sprinkles or Fresh Fruit (optional)
Instructions
- Crush the chocolate cookies into fine crumbs using a food processor or a zip-top bag and rolling pin. Mix the crumbs with melted butter until well combined, then press into the bottom of a springform pan. Freeze for 15 minutes to set.
- Soften the chocolate ice cream until spreadable, then spoon it over the crust. Smooth it out with a spatula and freeze for 30 minutes.
- Repeat the process with the vanilla ice cream, spreading evenly over the chocolate layer. Freeze for another 30 minutes.
- Finish with the softened strawberry ice cream as the top layer. Smooth it out and freeze the entire cake for at least 4 hours or overnight.
- Remove the cake from the pan and spread whipped cream over the top. You can pipe it for a decorative look or simply spread it evenly.
- Add sprinkles, fresh fruit, or any toppings you like. Slice and serve immediately for the best texture.
Notes
Let each ice cream flavor soften at room temperature for 10–15 minutes before spreading. Work quickly to prevent melting, and freeze between layers for clean, distinct layers.
Nutrition
- Serving Size: 1 slice
- Calories: 350
- Sugar: 28
- Fat: 18
- Protein: 5
Keywords: Neapolitan, Ice Cream Cake, Frozen Dessert, Summer Treat, Easy Recipe


