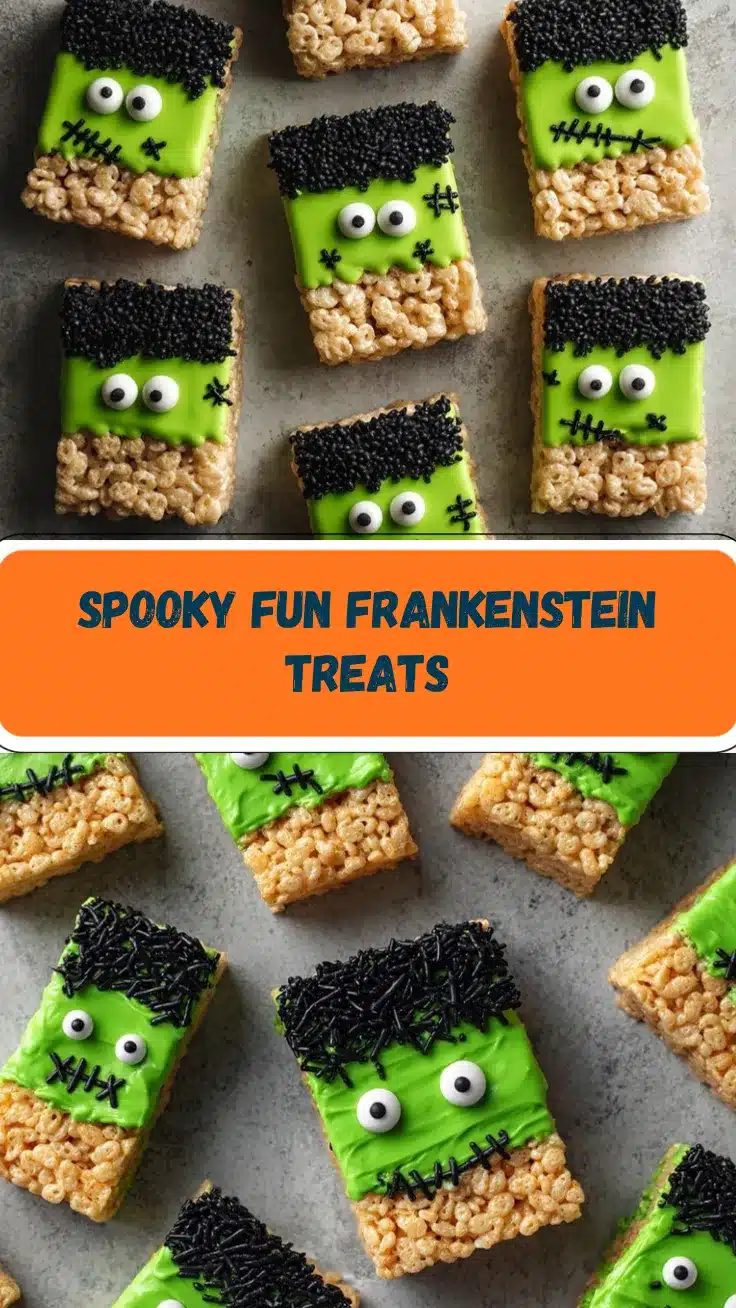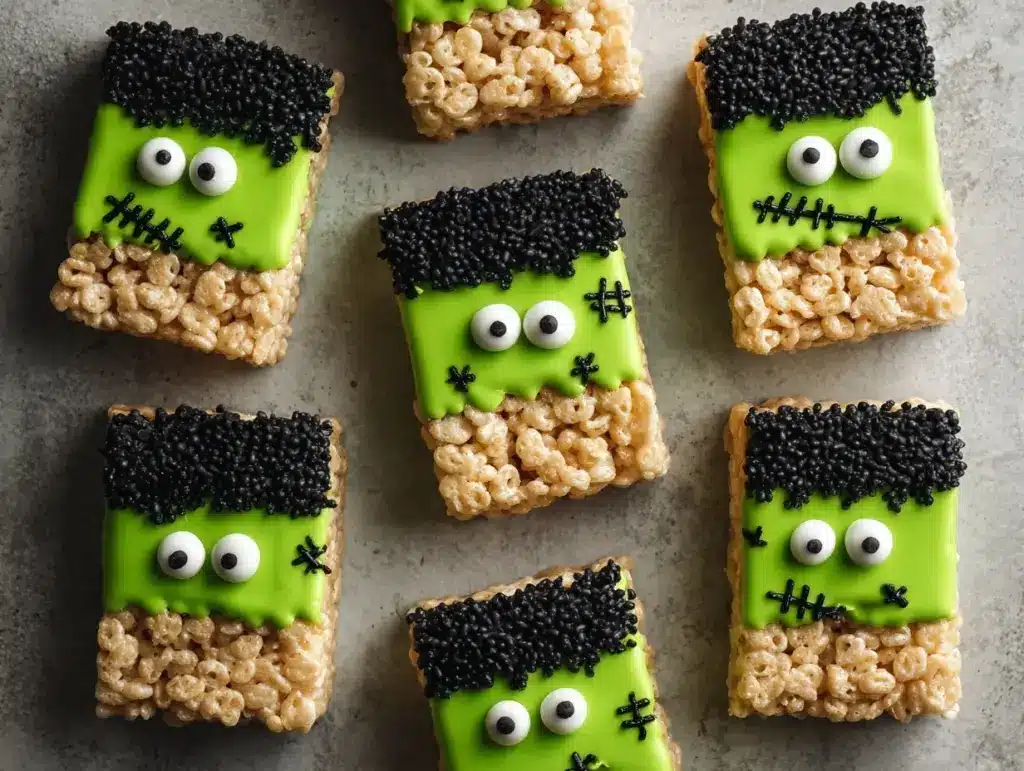
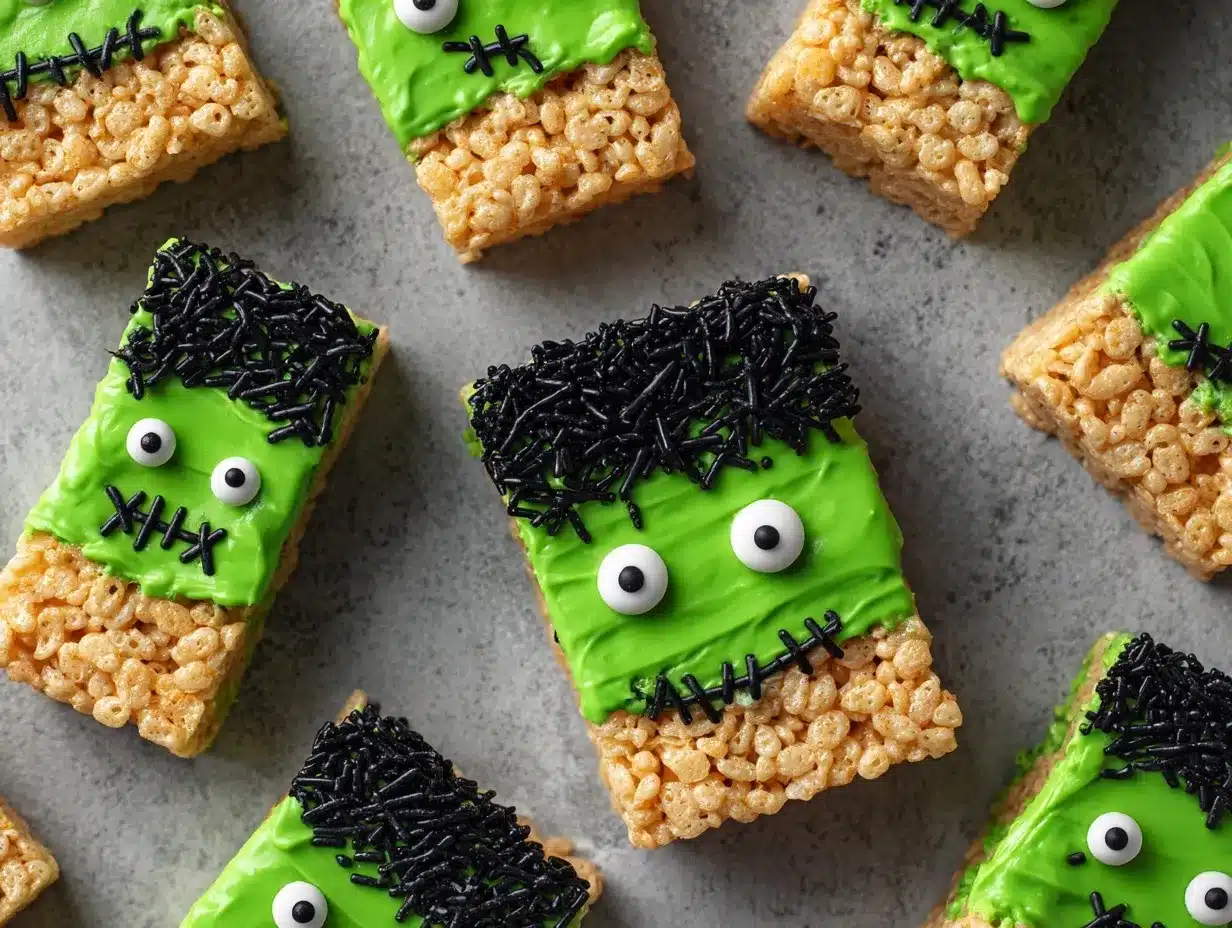
Halloween is hands-down my favorite time of year—there’s just something magical about the crisp fall air, creative costumes, and, of course, the spooky treats! These Spooky Frankenstein Rice Krispie Treats are the ultimate Halloween dessert. They’re not only adorable but also ridiculously easy to whip up. When I first made these, I couldn’t believe how much fun it was to turn a classic childhood favorite into something so festive and fun! Trust me, they’ll be the star of your Halloween party.
Picture this: gooey marshmallow goodness with a hint of vanilla, crispy rice cereal, and a bright green hue topped with cute little faces. Whether you’re hosting a Halloween bash or just looking to surprise your kids with a fun snack, Frankenstein Rice Krispie Treats will bring smiles (and maybe a few spooky screams) to everyone’s faces.
The best part? You don’t need to be a professional baker to make them! In fact, they’re so easy that you can even let the kids join in for some festive family bonding. Ready to create some frightfully fun treats? Let’s dive right in!
Why You’ll Love This Recipe
- Quick & Easy: You’ll have these spooky treats ready in under 30 minutes, making them perfect for any last-minute Halloween parties or school events.
- Kid-Friendly Fun: Little ones will love helping decorate Frankenstein faces—they’ll be so proud of their creepy creations!
- No Baking Required: Who has time for baking when there are costumes to prepare and candy to hand out? This recipe is all about simplicity.
- Classic Comfort: Everyone loves Rice Krispie treats, right? Add a fun Halloween twist, and you’ve got a treat that’s both nostalgic and festive.
- Customizable: Make them as spooky or silly as you like—add candy eyes, colorful sprinkles, or go wild with the decorating. The possibilities are endless!
What truly sets these Spooky Frankenstein Rice Krispie Treats apart is their charm. They’re not just delicious; they’re a fun centerpiece for your Halloween spread. Plus, they’re a great way to get creative with your kids or impress your guests with minimal effort. It’s the perfect balance of fun, flavor, and festive vibes!
What Ingredients You Will Need
This recipe uses simple ingredients that you likely already have in your pantry. If not, they’re easy to find at any grocery store. Here’s what you’ll need:
- Unsalted Butter: 5 tablespoons, melted (adds richness).
- Mini Marshmallows: 10 ounces (for the gooey texture).
- Rice Krispies Cereal: 6 cups (the star of the show).
- Green Food Coloring: A few drops (for that signature Frankenstein hue).
- Candy Eyes: To give your Frankensteins some personality.
- Black Icing: For drawing those spooky faces.
- Mini Pretzel Sticks: To create Frankenstein’s “bolts” on either side of his head.
If you’re out of mini marshmallows, you can substitute regular-sized marshmallows—just be sure to cut them into smaller pieces for easier melting. And if you’re avoiding artificial food coloring, try natural green color powders like matcha or spirulina for a healthier option. For dairy-free treats, swap out butter for coconut oil or vegan butter.
Equipment Needed
- Large Saucepan: For melting the butter and marshmallows.
- Wooden Spoon or Rubber Spatula: Essential for mixing everything together without sticking.
- 9×13-inch Baking Dish: To shape your Rice Krispie Treats into a flat slab.
- Parchment Paper: Keeps everything non-stick and easy to clean.
- Sharp Knife: For cutting the treats into Frankenstein-shaped rectangles.
- Decorating Supplies: Piping bag for icing or a ziploc bag with the corner snipped works in a pinch.
If you don’t have parchment paper, you can use a non-stick spray to grease the baking dish. And if you don’t have candy eyes, you can make your own using white chocolate chips and a dot of black icing!
Preparation Method
- Prepare the Baking Dish: Line a 9×13-inch baking dish with parchment paper or grease it with non-stick spray. Set aside.
- Melt Butter: In a large saucepan over medium heat, melt the butter until fully liquefied.
- Add Marshmallows: Pour the marshmallows into the melted butter and stir until fully melted and smooth. This will take about 3-5 minutes. (If the mixture starts to stick, lower the heat slightly and keep stirring.)
- Color the Mixture: Remove the saucepan from heat and add a few drops of green food coloring. Stir until the color is evenly distributed. Add more drops for a deeper green if needed.
- Mix in Rice Krispies: Gradually fold in the Rice Krispies cereal, ensuring every piece is coated in the gooey mixture.
- Press Into the Dish: Transfer the mixture to your prepared baking dish. Use a greased spatula or clean hands to press it evenly into the pan. Let cool for 10-15 minutes.
- Cut into Shapes: Once cooled, use a sharp knife to cut the slab into rectangular pieces—these will become your Frankenstein heads.
- Decorate: Use the black icing to draw Frankenstein’s hair, stitches, and mouth. Add candy eyes and press mini pretzel sticks into the sides for bolts.
- Serve: Arrange your spooky treats on a platter and get ready for the compliments!
Cooking Tips & Techniques
Want your Frankenstein Rice Krispie Treats to turn out perfectly spooky? Here are some tips:
- Don’t overheat the marshmallows: Too much heat can make them hard and chewy instead of soft and gooey. Stir continuously and remove from heat as soon as they’re melted.
- Work quickly: The marshmallow mixture sets fast, so have your baking dish and tools ready before you start.
- Grease your hands and tools: This prevents sticking and makes pressing the mixture into the pan much easier.
- Get creative with decorations: Use sprinkles, edible glitter, or different colored icings to make your monsters extra spooky!
- Use fresh marshmallows: Old marshmallows can make the texture less than ideal, so check the expiration date before starting.
Variations & Adaptations
Want to switch things up? Here are some fun variations:
- Chocolate Frankenstein Treats: Add a tablespoon of cocoa powder to the melted marshmallows for a chocolate twist. You can still dye them green for that spooky effect!
- Halloween Theme Galore: Use orange food coloring instead of green and make pumpkin-shaped treats with jack-o’-lantern faces.
- Gluten-Free Option: Swap out traditional Rice Krispies cereal for a gluten-free puffed rice cereal.
- Allergy-Friendly Version: Use vegan marshmallows and dairy-free butter for a treat everyone can enjoy.
- Flavor Adjustments: Add a splash of vanilla extract or a sprinkle of cinnamon to the marshmallow mixture for a unique taste.
Serving & Storage Suggestions
These spooky treats are best served at room temperature, arranged on a festive Halloween platter for maximum effect. Pair them with a warm cup of apple cider or hot cocoa for cozy Halloween vibes.
If you have leftovers (though I doubt you will!), store them in an airtight container at room temperature for up to 3 days. For longer storage, wrap them individually in plastic wrap and freeze for up to 2 months. To enjoy later, let them thaw at room temperature for about 30 minutes.
Pro tip: The flavors and textures are at their peak on the day they’re made, so plan accordingly if you’re serving these at an event.
Nutritional Information & Benefits
Here’s a rough estimate of the nutritional breakdown for these treats (per serving):
- Calories: Approximately 120-150
- Fat: 4g
- Carbohydrates: 24g
- Protein: 1g
The bright green color and fun decorations might steal the show, but let’s not forget the benefits of these treats being easy to make and a guaranteed crowd-pleaser. Plus, they’re naturally nut-free, making them a safe option for many school events or parties.
Conclusion
If you’re looking for a Halloween treat that’s equal parts spooky, adorable, and delicious, these Frankenstein Rice Krispie Treats are the answer. They’re fun to make, even more fun to decorate, and sure to be a hit with kids and adults alike. I love how they bring out the creative side in everyone, and they always make Halloween gatherings extra special.
Give these a try, and let me know how your spooky creations turn out! Share your photos and stories in the comments below—I’d love to see how you make them your own. Have a frightfully fun time making (and eating) these treats!
FAQs
Can I use regular-sized marshmallows instead of mini ones?
Absolutely! Just cut them into smaller pieces for easier melting.
Can I make these ahead of time?
Yes, they store well in an airtight container for up to 3 days. Just keep them at room temperature.
What can I use if I don’t have candy eyes?
You can make your own eyes using white chocolate chips and a dot of black icing or melted chocolate.
Can I make these gluten-free?
Yes, simply use a gluten-free puffed rice cereal instead of traditional Rice Krispies.
How do I prevent the mixture from sticking to my hands?
Grease your hands or spatula with a little butter or cooking spray before handling the mixture.
Pin This Recipe!