Picture this: creepy, edible ashtrays complete with “cigarette butts” that are as delicious as they are horrifying! These spooky Halloween ashtray treats are the ultimate party snack to thrill (and terrify!) your guests. When I first made these, I wasn’t sure how people would react, but let me tell you, they were an absolute hit. The combination of crunchy cookies, creamy fillings, and clever decorations make them a showstopper.
If you’re looking for a snack that will have everyone talking, you’ve found it. They’re easy to prepare, customizable, and just downright fun. Whether you’re hosting a Halloween bash or simply want to surprise your family, these ashtray treats will be unforgettable. Plus, they’re simpler than they look—no need for fancy baking skills here!
Why You’ll Love This Recipe
- Quick and Easy: These treats come together in under an hour, making them perfect for last-minute party planning.
- No Baking Required: With store-bought cookies and candies, you can skip the oven and focus on the fun decorating part.
- Perfect for Halloween: These ashtray treats are creepy, creative, and totally on-theme for spooky season.
- Crowd-Pleaser: Kids and adults alike will love the mix of sweet flavors and playful presentation.
- Completely Customizable: Use different fillings, candies, or decorations to make them your own.
What sets this recipe apart is how realistic these scary treats look—your guests will be doing double-takes. The crushed cookies mimic ashes perfectly, and the candy “cigarette butts” are both gross and hilarious. Trust me, this is one snack that will steal the show at your Halloween party!
What Ingredients You Will Need
This recipe uses simple pantry and store-bought ingredients to create a spooky masterpiece. Here’s what you’ll need:
- Oreos: Crushed to resemble ashes (use the classic variety).
- Vanilla pudding: Acts as the “base” in your ashtray.
- Candy sticks: To create your faux cigarette butts (look for white candy sticks).
- Orange and brown food coloring: For adding burnt details to the candy “cigarette butts.”
- Powdered sugar: To create a dusty, ash-like effect.
- Small plates or saucers: These will act as your edible “ashtrays.”
- Sprinkles: Optional for adding extra texture or color to the ashes.
If you want to add variety, you can swap out the pudding for chocolate mousse or use crushed graham crackers instead of Oreos. The candy sticks can be replaced with pretzel rods dipped in white chocolate for a salty-sweet twist.
Equipment Needed
You don’t need much to whip up these spooky treats! Here’s what you’ll need:
- Food processor or blender: For crushing the Oreos into fine crumbs.
- Mixing bowls: To prepare the pudding and crushed cookie mixture.
- Spoons: For layering and spreading the pudding and cookie crumbs.
- Paintbrush or toothpicks: To apply food coloring to the candy sticks.
- Small plates: These will serve as your edible “ashtrays.”
If you don’t have a food processor, you can crush the Oreos by placing them in a zip-top bag and smashing them with a rolling pin. For food coloring application, use the back of a spoon if you don’t have a paintbrush handy.
Preparation Method
- Prepare the pudding: Mix the vanilla pudding according to the package directions and let it chill in the refrigerator for about 10 minutes.
- Crush the Oreos: Using a food processor, pulse the Oreos until they resemble fine crumbs. If you don’t have a processor, place the cookies in a zip-top bag and crush them with a rolling pin.
- Color the candy sticks: Use a small brush or toothpick to apply streaks of orange and brown food coloring to the ends of the candy sticks. These will look like burnt cigarette tips. Set them aside to dry.
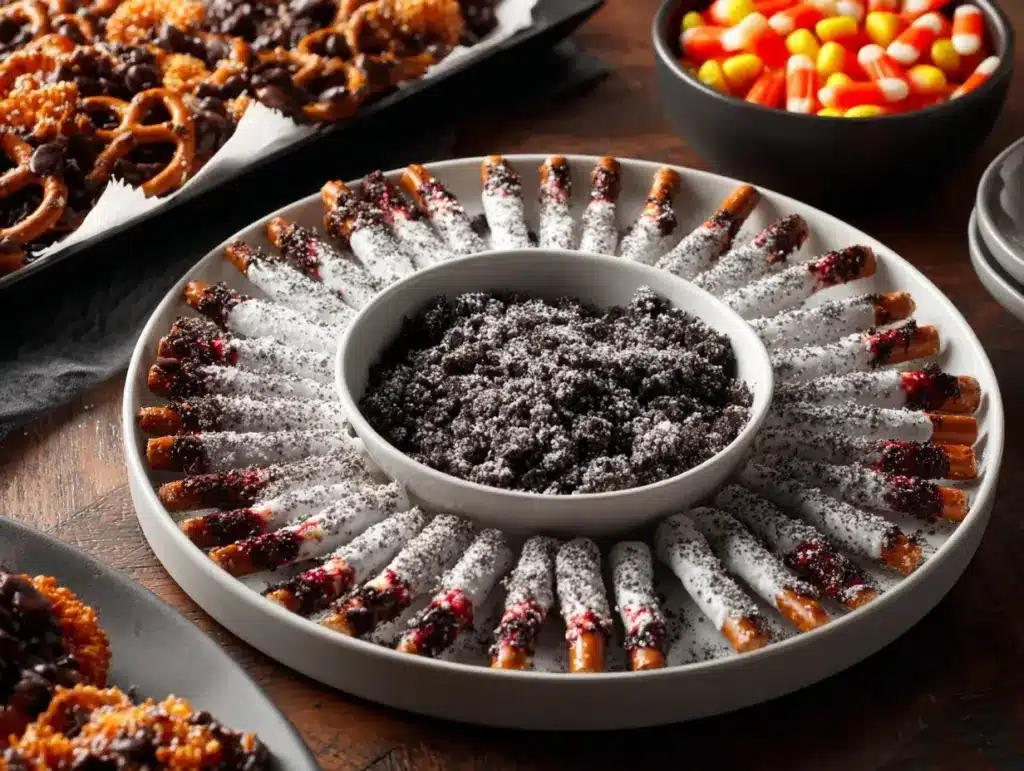
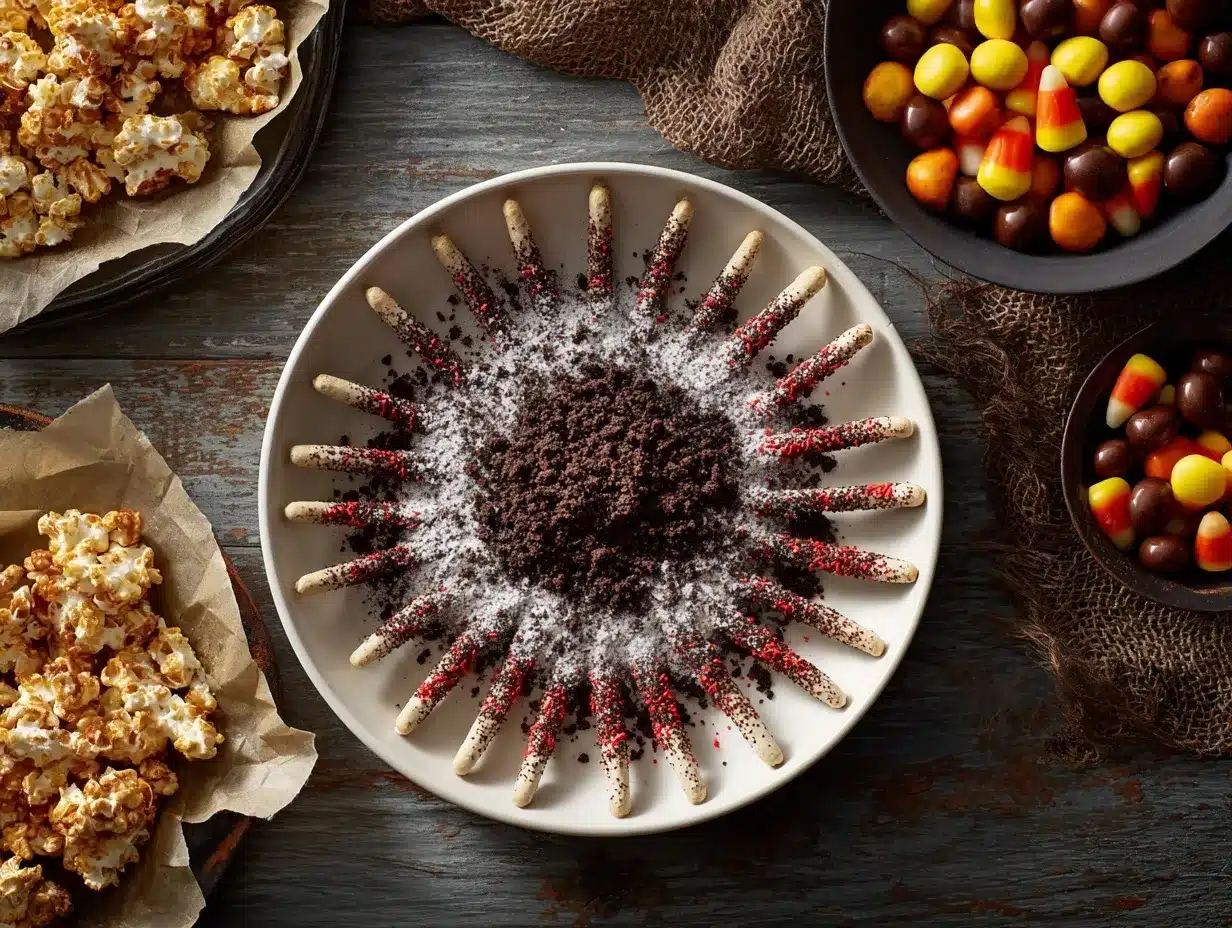
- Prepare the ashtrays: Spoon a layer of vanilla pudding onto each small plate or saucer. Spread it evenly to cover the surface.
- Add the “ashes”: Sprinkle the crushed Oreos over the pudding, covering it completely. Add powdered sugar for a dusty effect.
- Decorate with “cigarette butts”: Place the candy sticks on top of the cookie crumbs, arranging them to look like discarded cigarettes.
- Optional touch: Add sprinkles or small candies to the ashtray for extra flair.
- Chill and serve: Refrigerate the plates for at least 20 minutes before serving to let the pudding set and flavors meld together.
Serve your spooky Halloween ashtray treats chilled—they’re sure to be the talk of the party!
Cooking Tips & Techniques
- Don’t over-crush the Oreos: You want them to resemble ash, not powder. Leaving some slightly larger crumbs will add texture.
- Be mindful with food coloring: A little goes a long way, so use sparingly to avoid overly bright or artificial-looking “cigarette butts.”
- Use chilled pudding: Cold pudding helps the “ash” settle better and makes serving easier.
- Experiment with textures: Combine crushed Oreos with graham cracker crumbs or even cocoa powder for a more realistic ash effect.
- Decorate ahead: Paint the candy sticks a day before your event to save time and ensure the food coloring is fully dry.
Variations & Adaptations
- Dietary-friendly version: Use gluten-free Oreos and dairy-free pudding to make this recipe suitable for guests with dietary restrictions.
- Seasonal twist: Add pumpkin spice to the pudding for a seasonal flavor that screams fall.
- Flavor customizations: Swap vanilla pudding for chocolate mousse or caramel pudding for a richer taste.
- Different decorations: Use pretzel rods or licorice sticks instead of candy sticks for a fun twist.
- Kids’ version: Skip the cigarette theme and decorate with gummy worms, candy eyeballs, or spooky Halloween shapes for a less creepy treat.
Serving & Storage Suggestions
Serve these spooky Halloween ashtray treats chilled for the best texture and flavor. Arrange them on a festive platter, and don’t forget to warn your guests that they’re edible! Pair with Halloween-themed cocktails or mocktails for a complete spooky snack spread.
If you have leftovers (unlikely!), you can store them in the refrigerator for up to 2 days. Cover each “ashtray” with plastic wrap to keep them fresh. For reheating, skip the microwave and enjoy them cold—they taste better that way!
Nutritional Information & Benefits
While these treats are more about fun than nutrition, here’s a quick breakdown:
- Calories: Approximately 200 per serving.
- Carbohydrates: About 30g from the cookies and pudding.
- Protein: Around 2g.
- Fats: About 8g.
- Allergens: Contains gluten, dairy, and possible traces of nuts depending on the candy used.
The good news? These treats are small enough that you can indulge without guilt, and they’re perfect for sharing. Plus, you can easily swap ingredients to cater to dietary needs!
Conclusion
These spooky Halloween ashtray treats are creepy, unique, and downright delicious. They’re the perfect addition to your Halloween party and will leave everyone impressed by your creativity. I love making these every year because they’re so fun to assemble and always get a great reaction.
FAQs
Can I make these treats ahead of time?
Yes, you can prepare them a day in advance and store them in the refrigerator until you’re ready to serve.
What can I use instead of Oreos?
If you don’t like Oreos, you can use graham crackers, chocolate wafer cookies, or even brownies crumbled into small pieces.
How do I make these gluten-free?
Use gluten-free cookies and pudding to adapt this recipe for guests with gluten sensitivities.
Can kids eat these treats?
Definitely! If you want to make them less creepy, you can skip the cigarette theme and use fun Halloween decorations like gummy worms or candy pumpkins.
Do they need to be refrigerated?
Yes, these treats are best served chilled, especially if you’re using pudding as the base.
Pin This Recipe!