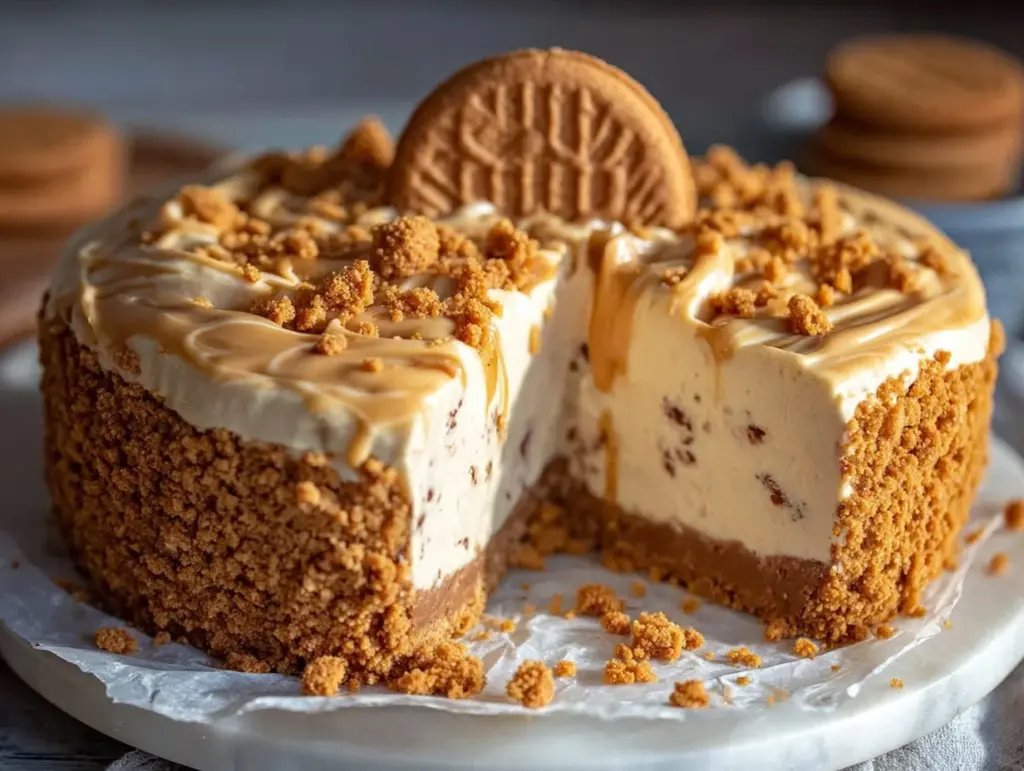
The first time I tasted a slice of biscoff cheesecake, I was instantly hooked. Honestly, the rich, creamy texture combined with that unmistakable caramelized cookie flavor just melts in your mouth. It takes me back to cozy afternoons spent with a cup of tea and a good book. I’ve tested this ultimate biscoff cheesecake recipe more times than I can count, tweaking the no-bake crust and crumble topping until it was just right. There’s something so satisfying about a dessert that doesn’t require an oven but still looks and tastes like it belongs in a fancy bakery.
What’s great about this biscoff cheesecake is how it balances indulgence with ease. The no-bake crust means no stress over melting or burning, and the crumble topping adds a delightful crunch that contrasts the silky filling perfectly. I love making this recipe for friends and family because it’s a guaranteed crowd-pleaser, whether for birthday parties, casual get-togethers, or just because. Plus, it’s a sweet treat that works for busy days when you want something impressive but don’t have hours to spare in the kitchen.
Whether you’re a biscoff fanatic or just looking for a luscious dessert that’s simple to make, this cheesecake fits the bill. It’s creamy, dreamy, and packed with that delicious biscoff cookie magic you can’t get enough of. After baking and assembling this several times, I can honestly say it’s become my go-to recipe whenever I want to impress with minimal effort. Trust me, once you try this ultimate biscoff cheesecake with its no-bake crust and crumble topping, it’ll be your new favorite, too.
Why You’ll Love This Recipe
- Quick & Easy: The no-bake crust means you’re skipping the oven, so this cheesecake comes together in under 30 minutes of active prep time.
- Simple Ingredients: You probably already have most of these pantry staples, plus the star biscoff cookies that bring all the flavor.
- Perfect for Any Occasion: Whether it’s a casual brunch, a holiday dessert, or a potluck hit, this cheesecake fits right in.
- Crowd-Pleaser: Kids and adults alike rave about that creamy biscoff filling paired with the crunchy crumble topping.
- Unbelievably Delicious: The combo of silky cream cheese, sweet biscoff spread, and buttery biscuit base is pure comfort in every bite.
- Unique Twist: Instead of your usual graham cracker crust, the no-bake biscoff crust creates a deeper, caramelized flavor that sets it apart.
This recipe isn’t just another cheesecake—it’s the ultimate biscoff cheesecake that I perfected after many experiments. Blending the biscoff spread right into the filling gives a smooth, rich flavor that you won’t find elsewhere. And that crumble topping? It’s the little crunch surprise that keeps you coming back for more. Honestly, it’s the kind of dessert that makes you close your eyes and savor every bite.
What Ingredients You Will Need
This recipe uses simple, wholesome ingredients to deliver bold biscoff flavor and a satisfying texture without fuss. Most are pantry staples—perfect for an impromptu dessert craving.
- For the No-Bake Crust:
- Biscoff cookies (about 200g or 7 oz) – crushed finely (I like to use Lotus Biscoff brand for that authentic caramelized flavor)
- Unsalted butter (100g or 7 tbsp), melted (adds richness and binds the crust)
- For the Cheesecake Filling:
- Cream cheese (450g or 16 oz), softened (full-fat for best creaminess)
- Powdered sugar (120g or 1 cup), sifted (controls sweetness)
- Biscoff spread (200g or about ¾ cup), smooth (the star ingredient)
- Heavy cream (240ml or 1 cup), cold (whipped for fluffy texture)
- Vanilla extract (1 tsp) (adds depth)
- Fresh lemon juice (1 tbsp) (balances sweetness)
- For the Crumble Topping:
- Biscoff cookies (100g or 3.5 oz), roughly chopped
- Butter (50g or 3½ tbsp), melted
- Brown sugar (2 tbsp) (optional, for extra caramel notes)
Ingredient Tips: Look for smooth biscoff spread—not chunky—so your filling is silky. If you want a gluten-free option, you can substitute with gluten-free biscoff-style cookies. For dairy-free, swap cream cheese and heavy cream with plant-based alternatives, though texture may vary slightly.
Equipment Needed
- Springform Pan (8 or 9-inch): Essential for easy removal of your cheesecake. I’ve tried a regular cake pan, but the springform makes serving way simpler.
- Mixing Bowls: At least two; one for crust ingredients and one for the filling.
- Electric Mixer or Stand Mixer: Whipping the cream and blending cream cheese is much easier with a mixer. Hand whisking is possible but takes more elbow grease.
- Food Processor or Rolling Pin: For crushing biscoff cookies finely. I personally prefer the food processor for uniform crumbs.
- Spatula and Spoon: For folding ingredients and smoothing the top.
If you don’t own a food processor, place cookies in a ziplock bag and crush with a rolling pin or heavy pan. For those on a budget, a hand mixer works just fine—the key is patience when whipping the cream.
Preparation Method
- Prepare the Crust: Crush 200g (7 oz) of biscoff cookies into fine crumbs using a food processor or rolling pin. Transfer to a bowl and mix in 100g (7 tbsp) melted unsalted butter until the crumbs hold together when pressed. This usually takes about 5 minutes. Press the mixture firmly into the base of your 8 or 9-inch springform pan, creating an even layer. Use the back of a spoon or a flat-bottomed glass for best results. Chill in the fridge while you prepare the filling (about 15-20 minutes).
- Make the Filling: In a large mixing bowl, beat the softened cream cheese (450g or 16 oz) on medium speed until smooth and creamy, around 2-3 minutes. Gradually add 120g (1 cup) powdered sugar, mixing well after each addition. Next, blend in 200g (¾ cup) biscoff spread and 1 teaspoon vanilla extract until fully combined. The mixture should be thick and luscious.
- Whip the Cream: In a separate chilled bowl, whip 240ml (1 cup) cold heavy cream until soft peaks form—this usually takes about 3-4 minutes with an electric mixer. Be careful not to overwhip, or it will turn grainy. Gently fold the whipped cream into the cream cheese mixture using a spatula, incorporating it in batches to keep the filling light and airy.
- Add Lemon Juice: Stir in 1 tablespoon fresh lemon juice. This little addition brightens all the sweetness and balances the biscoff flavor beautifully.
- Assemble the Cheesecake: Pour the filling over the chilled crust in the springform pan. Smooth the top evenly with a spatula. Cover loosely with plastic wrap and refrigerate for at least 4 hours, preferably overnight, to set perfectly.
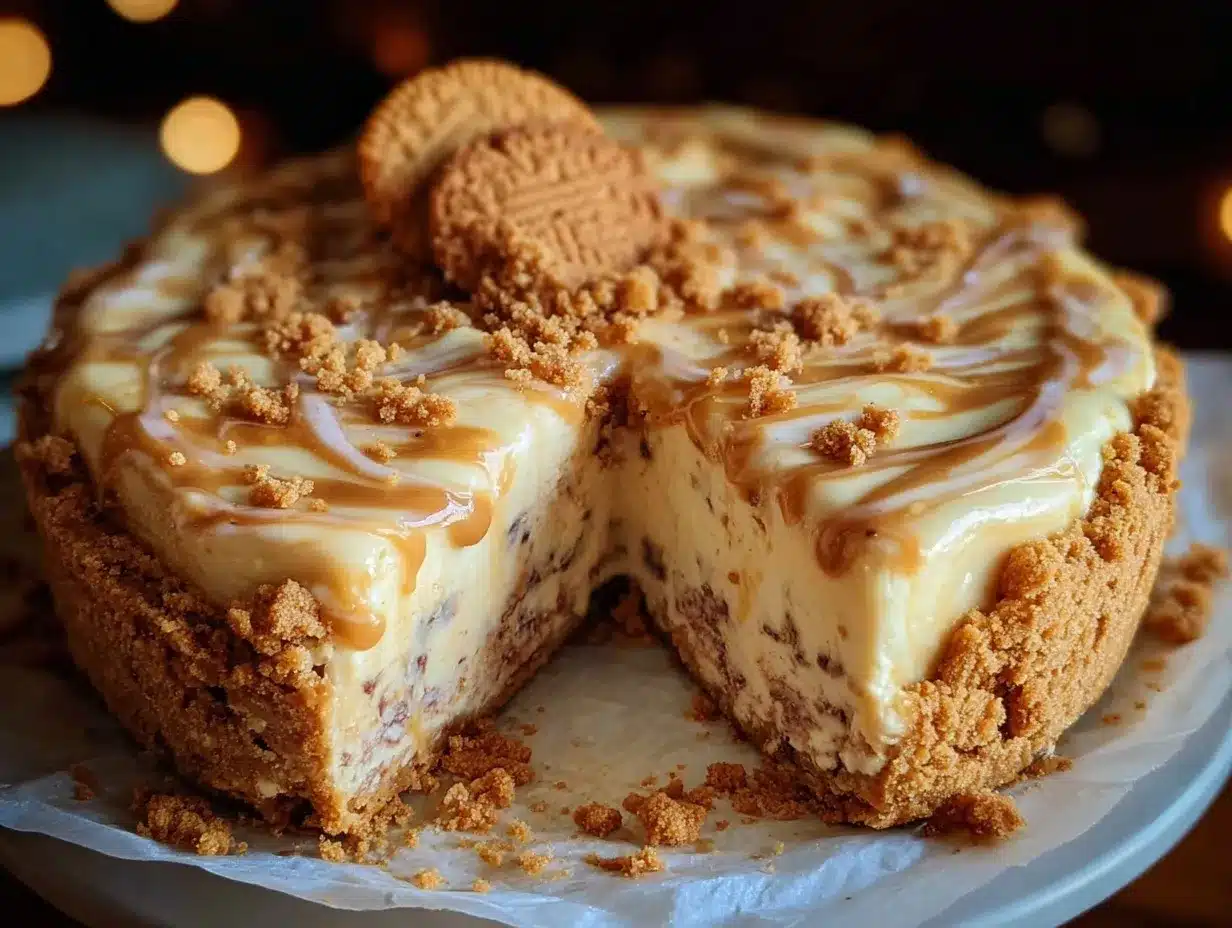
- Prepare the Crumble Topping: Before serving, mix 100g (3.5 oz) roughly chopped biscoff cookies with 50g (3½ tbsp) melted butter and 2 tablespoons brown sugar (optional) until crumbly. Scatter this generously over the set cheesecake for that irresistible crunch.
- Serve and Enjoy: Carefully release the sides of the springform pan. Slice with a sharp knife (dip in hot water and wipe dry between cuts for cleaner slices). Serve chilled and watch the smiles light up the room.
Pro tip: Keep the cheesecake chilled until right before serving to maintain that perfect texture. If you notice any cracks on the surface, cover with the crumble topping to mask imperfections and add texture.
Cooking Tips & Techniques
One key to this ultimate biscoff cheesecake’s success is the texture of the crust. Press the crumb mixture firmly and evenly to avoid a crumbly base that falls apart when sliced. I learned this the hard way after a few messy first attempts!
Whipping the cream just right is another crucial step. You want soft peaks—not too loose but not stiff. Over-whipping leads to a grainy texture that’s less enjoyable. I always chill my mixing bowl and beaters beforehand to speed up whipping and get a fluffier cream.
Folding the whipped cream into the cream cheese filling requires a gentle hand. Use a spatula and fold in a circular motion to keep the airiness intact—no vigorous mixing here! This step makes the cheesecake light yet rich.
Refrigeration time is non-negotiable. I’ve tried rushing it, and the cheesecake just doesn’t hold its shape. Four hours minimum, though overnight is best for flavor melding and firmness.
Finally, when slicing, a warm knife works wonders—dip it in hot water, wipe it dry, then cut. This simple trick prevents the filling from sticking to the blade and gives you clean, Instagram-worthy slices every time.
Variations & Adaptations
- Chocolate Biscoff Cheesecake: Swirl in 100g (3.5 oz) melted dark chocolate into the filling for a marbled effect. Add chocolate chips to the crumble topping for extra decadence.
- Gluten-Free Version: Use gluten-free biscoff-style cookies or substitute with crushed gluten-free graham crackers. Ensure all other ingredients are gluten-free certified.
- Vegan Adaptation: Swap cream cheese with vegan cream cheese (like cashew-based), replace heavy cream with coconut cream whipped until fluffy, and use dairy-free butter for the crust and crumble.
- Seasonal Twist: Add a layer of fresh berries or raspberry sauce between the crust and filling in summer for a fruity surprise.
Personally, I once tried adding a sprinkle of sea salt on the crumble topping. The salty-sweet contrast took the cheesecake to another level and was a hit at my last dinner party!
Serving & Storage Suggestions
This biscoff cheesecake is best served chilled, straight from the fridge. The contrast between the cool, creamy filling and the slightly crunchy crumble topping is divine. I like to plate it with a drizzle of biscoff spread warmed slightly to a pourable consistency, or a dollop of whipped cream for extra indulgence.
Pair it with a hot cup of coffee or chai tea—the caramel and spice notes marry beautifully. For an elegant touch, add a few toasted nuts or a sprinkle of cinnamon on top.
Store leftovers in an airtight container in the fridge for up to 4 days. The flavors actually deepen after a day or two, making it even better. If you want to keep it longer, you can freeze slices wrapped tightly in plastic wrap and foil for up to 2 months. Thaw overnight in the fridge before serving.
When reheating, avoid microwave heating as it changes texture. Instead, let it come to room temperature naturally or enjoy it chilled for the best experience.
Nutritional Information & Benefits
Each slice of this ultimate biscoff cheesecake contains approximately 450-500 calories, with a good balance of fats and carbohydrates. The cream cheese provides protein and calcium, while the biscoff cookies contribute carbohydrates and sugars.
This dessert is definitely an indulgence but can be enjoyed in moderation as part of a balanced diet. For those watching carbs, swapping some ingredients for lower-carb alternatives (like almond flour for crust) can reduce sugar and carb content.
The lemon juice adds a small vitamin C boost, and the biscoff spice blend often includes cinnamon and nutmeg, which have antioxidant properties.
If you have dairy allergies or gluten sensitivities, the variations section provides some useful substitutions to keep this recipe accessible.
Conclusion
Making this ultimate biscoff cheesecake with no-bake crust and crumble topping is honestly one of my favorite kitchen wins. It’s straightforward, quick, and results in a dessert that’s creamy, crunchy, and packed with that irresistible biscoff flavor. Whether you’re a seasoned baker or a newbie, the steps are foolproof and forgiving.
Feel free to customize the crumble, add chocolate swirls, or try the vegan version to make it your own. I love how versatile this recipe is, and how it always brings smiles to the table.
Give it a go, and let me know your favorite twist! Don’t forget to share your biscoff cheesecake photos and experiences in the comments below. Happy baking and even happier eating!
Frequently Asked Questions
Can I use regular cookies instead of biscoff for the crust?
Yes, you can substitute with graham crackers or digestive biscuits, but the signature biscoff flavor will be missed. For the full experience, biscoff cookies are recommended.
Do I need to bake this cheesecake?
Nope! This recipe uses a no-bake crust and filling, so it sets in the fridge. Perfect when you want to skip the oven.
How long does the cheesecake last in the fridge?
Stored properly in an airtight container or covered, it will last up to 4 days. The flavors actually improve after resting overnight.
Can I freeze the biscoff cheesecake?
Yes, slice and wrap pieces tightly, then freeze for up to 2 months. Thaw overnight in the fridge before serving.
Is it possible to make this recipe dairy-free?
Absolutely. Use vegan cream cheese, coconut cream whipped as a substitute for heavy cream, and dairy-free butter. The texture will be slightly different but still delicious.
Pin This Recipe!
Ultimate Biscoff Cheesecake Recipe Easy No-Bake Crust and Crumble Topping
A rich, creamy no-bake biscoff cheesecake with a caramelized cookie crust and crunchy crumble topping, perfect for any occasion and easy to prepare.
- Prep Time: 25 minutes
- Cook Time: 0 minutes
- Total Time: 4 hours 25 minutes
- Yield: 12 servings 1x
- Category: Dessert
- Cuisine: American
Ingredients
- 200g (7 oz) Biscoff cookies, crushed finely
- 100g (7 tbsp) unsalted butter, melted
- 450g (16 oz) cream cheese, softened (full-fat)
- 120g (1 cup) powdered sugar, sifted
- 200g (¾ cup) Biscoff spread, smooth
- 240ml (1 cup) heavy cream, cold
- 1 tsp vanilla extract
- 1 tbsp fresh lemon juice
- 100g (3.5 oz) Biscoff cookies, roughly chopped
- 50g (3½ tbsp) butter, melted
- 2 tbsp brown sugar (optional)
Instructions
- Prepare the Crust: Crush 200g (7 oz) of biscoff cookies into fine crumbs using a food processor or rolling pin. Mix in 100g (7 tbsp) melted unsalted butter until crumbs hold together. Press firmly into the base of an 8 or 9-inch springform pan. Chill in fridge for 15-20 minutes.
- Make the Filling: Beat softened cream cheese (450g/16 oz) until smooth. Gradually add powdered sugar (120g/1 cup), mixing well. Blend in biscoff spread (200g/¾ cup) and vanilla extract (1 tsp) until combined.
- Whip the Cream: Whip cold heavy cream (240ml/1 cup) until soft peaks form. Gently fold whipped cream into cream cheese mixture in batches to keep it light and airy.
- Add Lemon Juice: Stir in 1 tablespoon fresh lemon juice to balance sweetness.
- Assemble the Cheesecake: Pour filling over chilled crust and smooth top. Cover loosely and refrigerate at least 4 hours or overnight to set.
- Prepare the Crumble Topping: Mix roughly chopped biscoff cookies (100g/3.5 oz) with melted butter (50g/3½ tbsp) and brown sugar (2 tbsp, optional) until crumbly. Scatter over set cheesecake before serving.
- Serve and Enjoy: Release springform pan sides carefully. Slice with a warm knife dipped in hot water and wiped dry between cuts. Serve chilled.
Notes
Keep cheesecake chilled until serving to maintain texture. Use a warm knife dipped in hot water for clean slices. Overwhipping cream causes grainy texture; whip to soft peaks only. Press crust firmly to avoid crumbling. Refrigerate at least 4 hours or overnight for best results.
Nutrition
- Serving Size: 1 slice (1/12th of c
- Calories: 475
- Sugar: 28
- Sodium: 250
- Fat: 32
- Saturated Fat: 19
- Carbohydrates: 38
- Fiber: 1
- Protein: 6
Keywords: biscoff cheesecake, no-bake cheesecake, biscoff cookies, easy dessert, no-bake crust, crumble topping, creamy cheesecake