
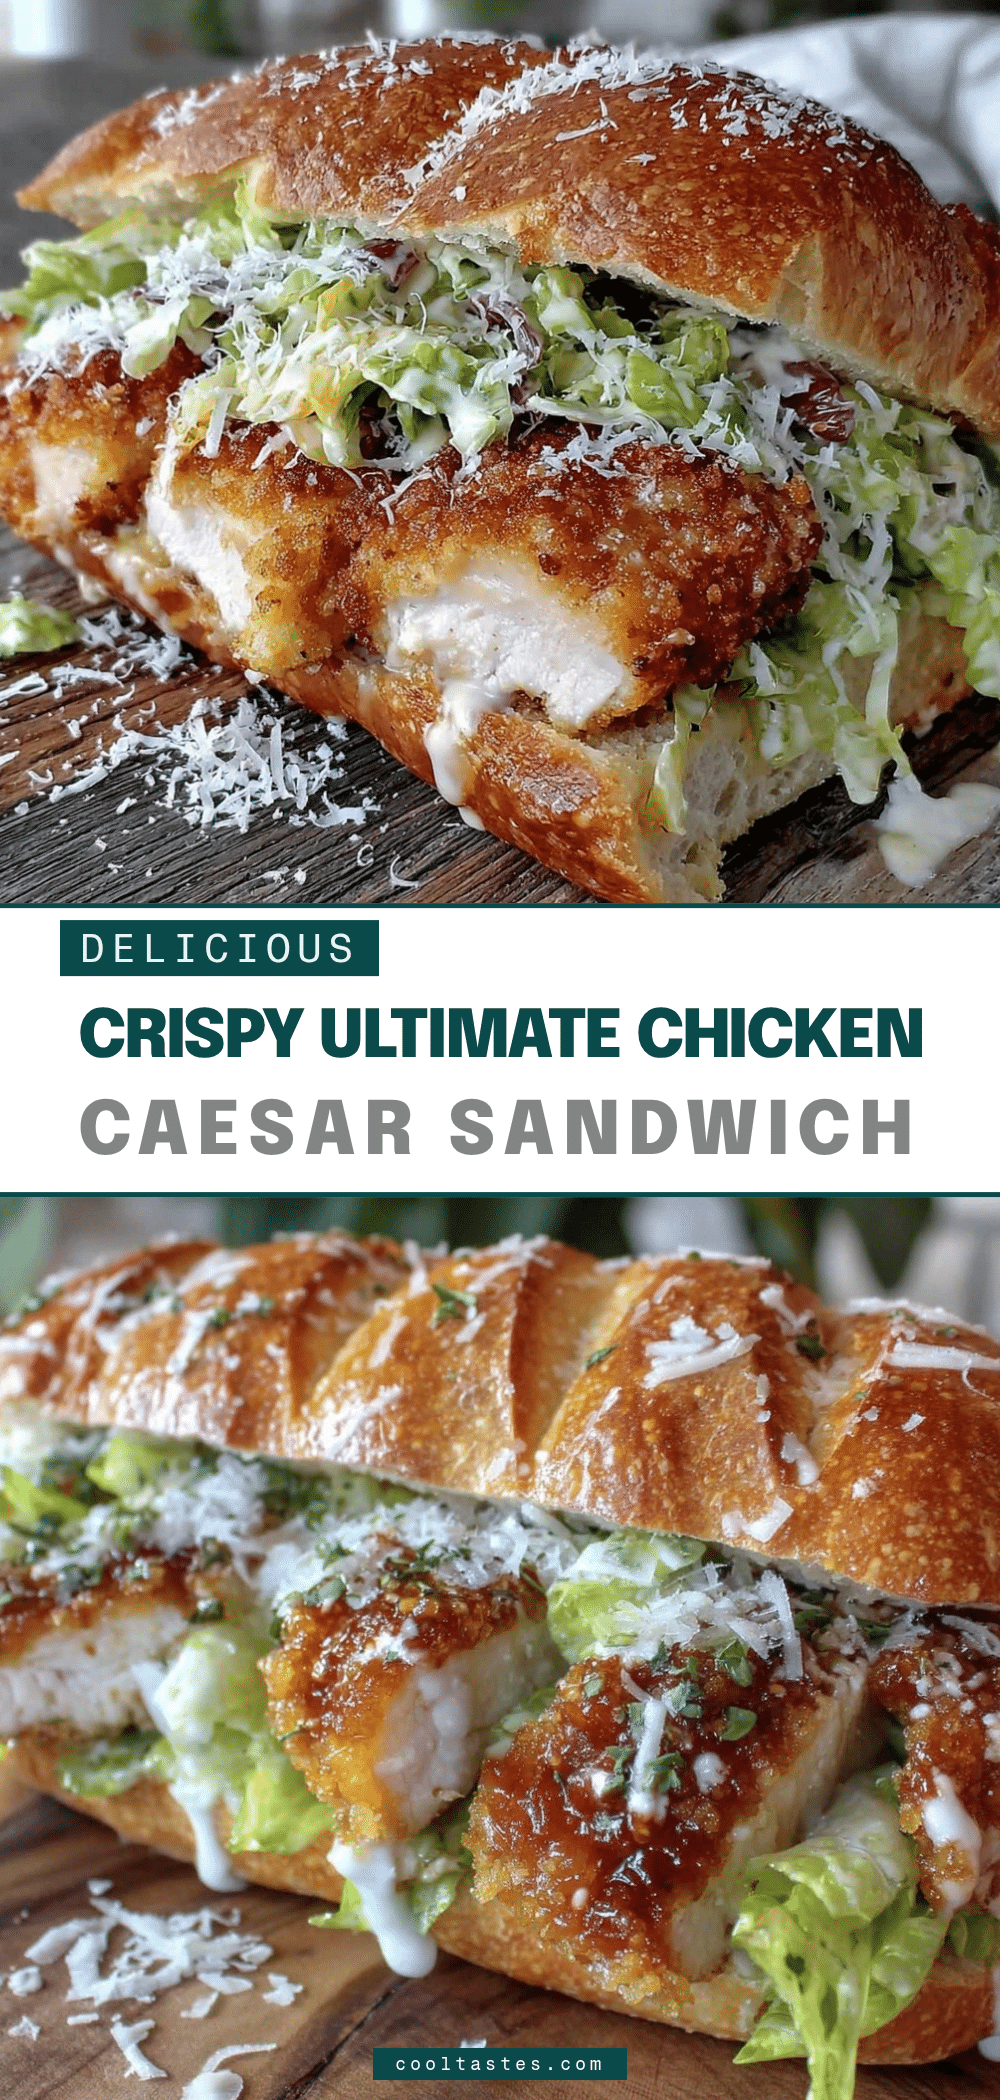
The crunch of perfectly fried chicken, the zing of a creamy Caesar dressing, and the fresh bite of crisp romaine all packed into a sandwich you’ll want to make again and again—that’s what the Ultimate Crispy Chicken Caesar Sandwich is all about. Honestly, the first time I whipped this up, I was craving something that hit all the right notes: crunchy, creamy, tangy, and just downright satisfying. I’d had my fair share of chicken sandwiches, but nothing quite nailed that Caesar salad vibe tucked inside a bun like this.
I stumbled on this recipe one evening when I had leftover chicken breasts and a craving for something different than the usual salad or grilled chicken. I decided to mix my favorite Caesar salad ingredients with a crispy chicken fillet, and, well, let’s just say it quickly became a lunch staple in my house. It’s a bit of comfort food flair meets a classic salad, and it’s perfect for anyone who loves that combo of textures and flavors.
This recipe isn’t just tasty—it’s practical for busy weekdays or weekend lunches. The crispy chicken adds protein and crunch while the Caesar elements bring freshness and a touch of indulgence. Plus, it’s a great way to use pantry staples without fussing over fancy ingredients. If you’re craving an easy sandwich that feels special but comes together quickly, this Ultimate Crispy Chicken Caesar Sandwich is your new go-to.
Why You’ll Love This Recipe
After making this sandwich dozens of times (and tweaking it along the way), I can confidently say it’s one of the most crowd-pleasing and satisfying sandwiches you’ll make at home. Here’s why it stands out:
- Quick & Easy: Ready in about 30 minutes, perfect for a speedy lunch or a last-minute dinner.
- Simple Ingredients: No need for specialty stores—chances are you have most of these in your kitchen already.
- Perfect for Any Occasion: Whether it’s a casual lunch, a picnic, or a game day snack, this sandwich fits right in.
- Crowd-Pleaser: Everyone from kids to adults loves the crispy texture paired with Caesar’s creamy zing.
- Unbelievably Delicious: The balance of crunchy, creamy, tangy, and savory flavors is spot on.
What makes this version unique? I blend the Caesar dressing right onto the chicken before frying, which locks in flavor and adds a little tang to every bite. Also, using crunchy romaine instead of iceberg adds a fresh snap that’s much better than soggy lettuce. It’s the kind of sandwich that makes you close your eyes and savor after the first bite because it balances comfort and sophistication so well.
And if you’re into easy weeknight meals, pairing this sandwich with a warm bowl of loaded potato soup or a creamy tomato soup makes for a meal that feels indulgent but isn’t a hassle to prepare.
What Ingredients You Will Need
This recipe relies on straightforward ingredients that come together to create bold flavors and a satisfying crunch. Here’s the rundown:
- Chicken breasts, boneless and skinless (about 2 large breasts, pounded to even thickness) – the star protein
- All-purpose flour (for dredging the chicken)
- Eggs, large, beaten (helps the breading stick)
- Panko breadcrumbs – I recommend Japanese-style for extra crunch
- Parmesan cheese, finely grated (adds savory depth in the coating)
- Salt and freshly ground black pepper, to taste
- Olive oil and/or vegetable oil, for frying
- Romaine lettuce leaves, washed and crisp (for fresh crunch)
- Tomato slices, ripe and juicy (optional, but adds a great fresh note)
- Caesar dressing, homemade or store-bought – creamy, garlicky, and tangy (I often use a good-quality brand like Ken’s or make a quick homemade version)
- Sandwich buns, brioche or ciabatta work beautifully for their sturdy yet soft texture
Optional add-ons include crisp bacon strips or avocado slices for extra richness. When selecting chicken, I find that thinner breasts cook more evenly, so pounding them out helps. For a gluten-free twist, swapping panko breadcrumbs with almond flour works well, though the texture will be a bit different.
Equipment Needed
- Large skillet or frying pan – a heavy-bottomed pan works best for even frying
- Meat mallet or rolling pin – to pound chicken breasts evenly
- Mixing bowls – for dredging stations (flour, egg, breadcrumb mixes)
- Tongs – for flipping the chicken without breaking the crust
- Paper towels – to drain excess oil after frying
- Sharp knife and cutting board – for slicing tomatoes and buns
If you don’t have a meat mallet, the bottom of a heavy glass or small skillet works fine to gently flatten chicken. For oil, I prefer vegetable oil because it withstands higher heat without smoking much, but olive oil adds a nice flavor if you watch the temperature closely. Keeping a thermometer handy helps maintain the oil between 350–375°F (175–190°C) for the crispiest results.
Preparation Method

- Prepare the chicken: Start by trimming any excess fat from the boneless chicken breasts. Place each breast between two sheets of plastic wrap or parchment paper. Using a meat mallet or rolling pin, gently pound the chicken to an even thickness, about ½ inch (1.3 cm). This helps it cook evenly and stay juicy.
- Set up dredging stations: In one shallow bowl, add ½ cup (60 g) all-purpose flour seasoned with ½ teaspoon salt and ¼ teaspoon black pepper. In a second bowl, beat 2 large eggs. In a third bowl, combine 1 cup (90 g) panko breadcrumbs with ¼ cup (25 g) finely grated Parmesan cheese.
- Coat the chicken: Dip each chicken breast first into the flour, shaking off excess, then into the beaten eggs, and finally into the panko-Parmesan mixture, pressing gently so the coating sticks well. Set aside on a plate.
- Heat the oil: Pour about ¼ inch (6 mm) of oil into a large skillet and heat over medium-high until shimmering and around 350°F (175°C). To test, drop a small breadcrumb in—the oil should sizzle immediately.
- Fry the chicken: Carefully place the breaded chicken breasts into the hot oil. Fry for about 3–4 minutes per side, or until golden brown and cooked through (internal temperature should reach 165°F / 74°C). Adjust heat as needed to prevent burning. Use tongs to flip gently.
- Drain and rest: Transfer the fried chicken to a paper towel-lined plate to drain excess oil. Let it rest for a few minutes to keep juices locked in.
- Toast the buns: While the chicken rests, slice your sandwich buns and lightly toast them in a dry skillet or under the broiler until golden and crisp.
- Assemble the sandwich: Spread a generous layer of Caesar dressing on both halves of the bun. Layer with crispy romaine lettuce, a thick slice of the fried chicken, optional tomato slices, and a sprinkle of freshly cracked black pepper. Close the sandwich and press gently.
- Serve: Serve immediately while the chicken is still warm and crunchy.
Pro tip: If your dressing is too thick, thin it slightly with a splash of water or lemon juice to help it spread smoothly. And don’t skip toasting the buns—that little step adds just enough crunch to balance the creamy dressing and crispy chicken.
Cooking Tips & Techniques
Getting that perfect crunch and juicy chicken can be tricky, but I’ve learned a few tricks along the way. First, always pound your chicken evenly—that’s the easiest way to avoid dry edges or undercooked centers. Also, don’t rush the frying; moderate oil temperature is key. If it’s too hot, the crust burns before the chicken cooks through, if too cool, you end up soggy.
Using panko breadcrumbs mixed with Parmesan gives the breading a great texture and flavor. I’ve found that pressing the crumb mixture firmly onto the chicken helps it stay put during frying. And remember to let the chicken rest on paper towels after frying to absorb excess grease.
One mistake I made early on was overloading the pan. Crowding lowers the oil temperature and results in oily chicken. Fry in batches if needed. Multitasking tip: while the chicken fries, prep your toppings and toast the buns so assembly is quick and seamless.
Variations & Adaptations
This sandwich is pretty flexible—here are some ways you can tweak it:
- Low-carb version: Swap the bun for a large lettuce leaf or a keto-friendly bread alternative.
- Spicy kick: Add a dash of cayenne or smoked paprika to the breadcrumb mix for a smoky heat.
- Grilled chicken: Skip frying and grill marinated chicken breasts for a lighter take—just brush with Caesar dressing after cooking.
- Dairy-free: Use a vegan Caesar dressing and omit Parmesan or replace it with nutritional yeast in the breadcrumbs.
- Extra crunch: Add crispy bacon or fried onions for a layered texture experience. I tried bacon once and it was a game-changer!
Serving & Storage Suggestions
This sandwich shines best served hot and fresh, with the chicken still crispy and the lettuce cool and crunchy. Serve it with a side of kettle chips or a light salad for a balanced meal. If you want a cozy combo, pairing it with a bowl of creamy tomato soup like the one from easy creamy tomato soup hits the spot perfectly.
To store leftovers, wrap the chicken separately in foil or airtight containers and keep the buns and lettuce chilled. Reheat the chicken in a hot oven (around 375°F / 190°C) for 10 minutes to bring back its crunch. Avoid microwaving as it tends to make the crust soggy.
The flavors meld nicely even after a day, so this sandwich can taste great cold or room temperature too if you’re packing it for lunch.
Nutritional Information & Benefits
The Ultimate Crispy Chicken Caesar Sandwich offers a good balance of protein, fats, and carbs. A typical serving clocks in around 550–650 calories depending on bun choice and extras. Chicken offers lean protein to keep you full, while the romaine brings fiber and vitamins A and K. Parmesan adds calcium and a savory boost.
This recipe can be adapted for gluten-free diets by using almond flour or gluten-free breadcrumbs. It’s also a great option for those watching calories if you skip the frying and opt for baking or grilling.
From my experience as someone who values both taste and nutrition, this sandwich is a satisfying way to enjoy comfort food without feeling weighed down.
Conclusion
The Ultimate Crispy Chicken Caesar Sandwich is my go-to when I want something quick, delicious, and a little bit special without the fuss. It’s that perfect balance of crunchy and creamy, fresh and savory, that hits the spot every time. I encourage you to try it, tweak it to your taste, and make it your own.
Once you’ve made it, I’d love to hear how you customized your sandwich or what sides you paired it with. Drop a comment below or share your thoughts! Remember, cooking should be fun and personal—this recipe is just the starting point for your own kitchen creations.
Here’s to many crispy, flavorful sandwiches ahead—happy cooking!
FAQs About Ultimate Crispy Chicken Caesar Sandwich
How do I keep the chicken crispy after assembling the sandwich?
Keep the chicken separate until just before serving if possible. Assemble quickly and eat immediately. Toasted buns and crisp lettuce help maintain contrast. Reheating in the oven can restore crunch if needed.
Can I make the Caesar dressing from scratch?
Absolutely! A simple Caesar dressing can be made with mayonnaise, garlic, lemon juice, anchovy paste (optional), Dijon mustard, and Parmesan. It tastes fresher and you control the ingredients.
What’s the best bread for this sandwich?
I recommend brioche or ciabatta buns because they’re sturdy enough to hold the fillings but soft enough to bite into comfortably. You can also use a crusty baguette or sandwich roll.
Can I bake the chicken instead of frying it?
Yes, baking is a healthier alternative. Coat the chicken as usual, place on a greased baking sheet, and bake at 400°F (200°C) for about 20 minutes or until cooked through and crispy.
Is there a vegetarian option for this sandwich?
Try swapping the chicken for crispy fried tofu or a large grilled portobello mushroom, seasoned with Caesar dressing and coated in panko for similar texture and flavor.
Pin This Recipe!
Ultimate Crispy Chicken Caesar Sandwich

A crunchy, creamy, and tangy chicken sandwich combining perfectly fried chicken with classic Caesar salad ingredients for a satisfying lunch or dinner.
- Prep Time: 15 minutes
- Cook Time: 15 minutes
- Total Time: 30 minutes
- Yield: 2 servings 1x
- Category: Main Course
- Cuisine: American
Ingredients
- 2 large boneless, skinless chicken breasts, pounded to even thickness
- 1/2 cup all-purpose flour
- 1/2 teaspoon salt
- 1/4 teaspoon freshly ground black pepper
- 2 large eggs, beaten
- 1 cup panko breadcrumbs (Japanese-style recommended)
- 1/4 cup finely grated Parmesan cheese
- Olive oil and/or vegetable oil for frying (about 1/4 inch depth)
- Romaine lettuce leaves, washed and crisp
- Tomato slices (optional)
- Caesar dressing (homemade or store-bought)
- Sandwich buns (brioche or ciabatta recommended)
Instructions
- Trim any excess fat from the chicken breasts. Place each breast between two sheets of plastic wrap or parchment paper and gently pound to about 1/2 inch thickness.
- Set up dredging stations: In one bowl, mix flour with salt and pepper. In a second bowl, beat the eggs. In a third bowl, combine panko breadcrumbs and Parmesan cheese.
- Coat each chicken breast by dipping first into the flour mixture, shaking off excess, then into the beaten eggs, and finally into the panko-Parmesan mixture, pressing gently to adhere.
- Heat about 1/4 inch of oil in a large skillet over medium-high heat until shimmering and around 350°F (175°C).
- Carefully fry the chicken breasts for 3-4 minutes per side until golden brown and cooked through (internal temperature 165°F / 74°C). Adjust heat as needed.
- Transfer fried chicken to a paper towel-lined plate to drain excess oil and let rest for a few minutes.
- Slice and lightly toast the sandwich buns in a dry skillet or under the broiler until golden and crisp.
- Spread Caesar dressing generously on both halves of the buns. Layer with romaine lettuce, fried chicken, optional tomato slices, and a sprinkle of freshly cracked black pepper.
- Close the sandwich and serve immediately while the chicken is warm and crispy.
Notes
Pound chicken evenly to ensure even cooking and juiciness. Maintain oil temperature between 350–375°F for best crispiness. Toast buns to add crunch and balance creamy dressing. For gluten-free, substitute panko with almond flour. Baking at 400°F for 20 minutes is a healthier alternative to frying.
Nutrition
- Serving Size: 1 sandwich
- Calories: 600
- Sugar: 4
- Sodium: 900
- Fat: 30
- Saturated Fat: 7
- Carbohydrates: 45
- Fiber: 3
- Protein: 40
Keywords: crispy chicken sandwich, Caesar sandwich, chicken Caesar, homemade sandwich, lunch recipe, easy chicken sandwich


